Pages

Thursday, November 28, 2013

Miniature Snow Sculptures


Day 21: Miniature Snow Sculptures

When we lived near Indianapolis, our neighbor would always make different snow sculptures as he cleared the snow off his driveway. I saw large sculpted rabbits and other interesting creatures. It reminded me of when I lived in Japan. I went to an snow festival in the mountains of Japan with a friend. This was the large snow "stage" where they had singing, dancing, and other performances. Pretty amazing! Take a little walk down memory lane with me and think of the possibilities of snow sculptures in your yard or public space. 


Throughout the town they had sculptures which could be viewed. 


There was plenty of snow, so we made snow angels.


And had a snowball fight! I enjoyed many things about the trip (like fish on a stick, the hot chocolate, etc.), but the snow was the highlight! Of course, now I wish I had taken more pictures for snow sculpture inspiration; however, you can see other examples here. This explains how they make the larger, more complex sculptures. For the average backyard person, here are tips on making a snow sculpture. When working with young children, the author encouraged a simple shape, like a turtle to start. 


Now that you've looked at some possibilities, please realized my own attempts were not so grandiose. In my tiny snowman, I added some natural elements to help round him out, still using a minimalist style. 


What is this? It reminds me of how my younger son eats the outside of the tortilla and calls it a sun! 


I even added some of my color to it from my spray bottle for coloring the snow.


So, a little inspiration, minor attempts for examples of what you can do, and plenty of snow in some parts to try your own hand at something! What kind of snow art will you make this winter? 

Be sure to have a snowball fight, make a snow angel, and wonder at the miracle of snow flakes while you are out there! 

Wednesday, November 27, 2013

Snow Designs


Day 20: Snow Designs

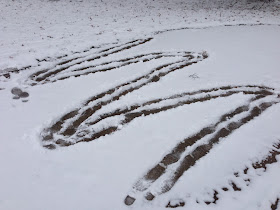
With our snow, I spent some time making different designs in the snow. Of course, shovels or other methods could be used, but I just used plain ole' feet to make my spiral design. Do you see the snowy bicycle contraption in the back? That's the 4-year-old son's "sculpture". It seems like he took half the toys off the front porch and tied them altogether with rope so that it can't be ridden. Interesting! I look forward to see where he goes with it! 


Different angles give it a different view! 


Chevrons have been hot recently, so I thought I'd try more linear designs with diagonals.


Another neat approach when you have undisturbed snow! I can't wait to see what you do with it! 


A good nature study to go with these would be looking at ice crystals, snowflakes, etc. It's always fun to cut out snowflakes from paper when you're inside. 

Monday, November 25, 2013

Snow Sculpture Bird Feeder


Day 19: Snow Sculpture Bird Feeder

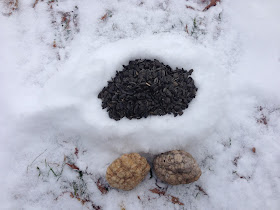
Okay, we didn't have THAT much snow--not quite enough to make a snowman. I've seen several pictures of snowmen with a hollow head filled with bird seed. I thought I'd use that concept and see what I could come up with! 

I made a nest of sorts under the bird feeder, since I've already been seeing juncos out there as it is. I grabbed a couple of rocks from the nearby rock collection and called it good. Looking at the picture, I see great potential with the nearby leaves and grass! 


What has been most fun about this little journey is watching the birds eat it up! 

Snow Painting


Day 18: Snow Painting!

We woke up to a bit of snow this week--it's the most we have had so far this year! The first snowfall is always a little magical. 

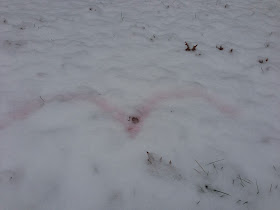
I've done snow painting with preschoolers last winter. We just used spray bottles with water and food coloring. This time, I had a little of blueberry juice and decided to try it out! The colors were not as vibrant, but the method of spraying also diffuses the potency of color as well. Trying out different natural dyes is pretty fun, like when we colored Easter eggs this last spring. 


I tried a little writing: Hello, world! I wonder if the birds will read it. 


Our last name is Gull, so I also tried making the classic seagull shape. 


Other options for this include using condiment bottles. This would make a more concentrated color in one place. An eye dropper and cups of colored water would also add a different approach to the concept. Cups of water could also be used, yet there would not be as much control over the product.

I also usually have a whole array of colors when I do this at the nature center, which might add to the mix. I wasn't terribly thrilled with the results, but wouldn't mind exploring the technique more. I like how transient the art is--it will quickly be covered over by more snow or melt into the grass again. 

Here are a few other takes done by others:
Using Stencils--they also used kool-aid for the color

If you try it, share what you've done! Enjoy the snow! 

Sunday, November 24, 2013

Cardboard Bird Feeders


Day 17: Cardboard Bird Feeders 

I love the recycled nature of these bird feeders, the options to interpret this as one desires, the giving nature of feeding the birds, and the visual aspect of these twirling in the wind! We made these last year for the nature preschool at Woodlawn Nature Center near Valentine's Day, with a heart shaped cardboard as our base. I thought they'd be fun to explore again. 

Supplies: Bird feed, scissors, cardboard, pie tin, peanut butter, hole punch, yarn, butter knife


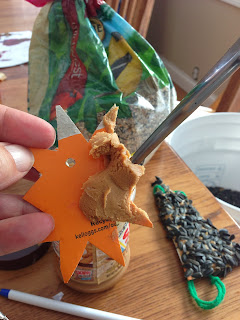
I used scissors to cut up cereal boxes into different shapes. Any shape that can be hung could work! Use your imagination! After cutting them out, I punched a hole to hang the bird feeders. I used my Crop-A-Dile II Big Bite Punch --love this thing as it easily goes through cardboard and lets me put the hole where I need it, rather than be limited by a regular hole punch. 


I spread peanut butter on my shapes with a knife and then dipped it in the bird feed. As I've talked with naturalists at nature centers, they have recommended black oil sunflower seed as being the best feed. It doesn't have filler and attracts a large variety of birds. 


I like using old pie tins to hold bird feed. This mis has a better ration than some that have more corn. It's also neat to see different textures. I had to poke a hole through the peanut butter with a pen to guide my yarn through. 


After tying a yarn (though any ribbons would be great!), we hung them outside! They could also be made into mobiles and arranged in other artistic manners. We may visit these again next month in 31 Days of Nature Giving. We have early Christmas with family this next week so may be sharing the bird feeder love.


Tuesday, November 19, 2013

Leaf Threading


Day 18: Leaf Threading

Many of us have used lacing cards or bead stringing. Why not try it artistically with leaves? 

Once again, we found ourselves waiting at the library. Before we left home, I grabbed yarn and my Crop-A-Dile . I love my crop-a-dile, except now they sell blue ones. I guess everything can't be color coordinated in life, though it does look good with the fall colors. I had leaves in the car, though we also found some nearby. Shh! I didn't think they would mind--it looked like they had raked and just had a few left over. 


I used my Crop-A-Dile to punch holes in my leaves to make it easier to thread my yarn. I threaded as I punched. 


After my son saw the string above, he said, "Mom, you should make a leaf necklace!"


So, we did. But he was eating a granola bar and ended up with a funny grin. :-) 


I think these would be pretty just hanging down with leaves suspended, but maybe not quite by the picnic bench. I also like it hung as a bunting! 


Any type of thread, yarn, jute, twine, etc. could be used for leaf threading. Colors, shapes, combinations, etc. can be taken into consideration as you look at the artistic side of the piece of art. This could be a great way to review leaf names, too. The same concept could be applied to leaves dipped in wax, preserved in paper, "rubbed" onto paper with crayon, etc. 

Monday, November 18, 2013

Leaf Rubbings


Day 11: Leaf Rubbings

We had some fresh leaves recently and tried various activities with them. In this case, we just tried a simple leaf rubbing with crayons. We used colored crayons, taking the paper off the crayons, so we could use the side of the crayon for a broad, even coverage of the leaves. I put the leaves under the paper, with the vein sides up. I put a piece of plain white paper on top, though several paper options could be used, such as recycled packing paper. 


I started in one corner with an orange crayon. 


I went over the whole paper with the orange crayon, with the leaves popping up little by little. 


I moved my paper slightly and added another layer of red on top of the orange. 


Later, I grabbed a teal crayon, moving the paper even more. I really liked how it felt like the leaves were moving. It shows the many colors (and then some) we might see in the fall. I particularly liked including the stem for the rubbings as it makes a dark, bold color and line. 


Later, I took this one step farther with water colors. See how I did this here. I think this would look great in a frame! 

Leaf Prints


Day 14: Leaf Imprints

Before all the leaves turned too crunchy, we saved a few fresher leaves to use for imprints. We painted on the vein side of the leaves, covering all the parts lightly (or heavily, in the four-year-old's side of things). My son was actually just happy painting the leaves; however, when he saw my next steps, he started trying different techniques, too.


After painting the leaves (while they were still wet), I turned them over and pressed down with my hands to get contact with paint and paper over the whole surface area of the leaf. A brayer would be a great help in both applying the paint and pressing the leaf on the paper to make the print. Hmm . . . couldn't find my brayer today!


As I mentioned, my son put lots of paint on his leaves. I like how used lots of different colors and blended them together. Good color exploration going on! He also decided the paper needed more paint. He was watching me and started doing exactly what he'd seen me do!


My nature boy was happy with his results, but I think he liked the painted leaves leftover just as much!


Natural extensions of this would be shapes, trees, textures, color blending, etc. Try it on muslin or other fabric for a neat effect (though you might use paint intended for fabric). I just saw a sweatshirt last week with leaf prints all over it. Cute!